Here we are again with another small scope in need of attention! The Celestron C70 is yet another bargain purchase and an oportunity to turn what many consider to be a lacklustre spotting scope with minor “Astro” pretentions, into a solid performer for it’s limited aperture.
First off… lets see what it’s made of and where the scope fails…. At first glance the build quality seems okay, it’s quite weighty compared to a similar sized refractor but looks aren’t everything. The C70 is advertised as a 70mm Maksutov with 25x to 75x zoom eyepiece, like all other spotters it has a built in mounting point enabling easy mounting to any photo tripod. The construction is almost entirely of plastic! the corrector cell is aluminium and so is the eyepiece mount, but the only other metal parts are the focuser mechanism and primary mirror mount. The zoom ep works well and feels smooth in use. It did come with a tabletop tripod which i sold on to a friend, this made the little C70 even more of a bargain meaning i wouldn’t be risking much by taking it apart.
Why? you may ask would i take apart a perfectly good scope, well it wasn’t all good when i recieved it…. there was a lot of slop in the focuser which needed attention.Never one to shy away from a challenge i decided to see just how bad the problem was, so i star tested it on the first clear night. What is immediately obvious is a lack of finder scope, this made locating objects rather difficult and will be a matter to address later. The views weren’t exactly pin sharp either which surprised me after using the Skymax 102, i was expecting nice clear views from the C70 but the dim and slightly unfocused images were a disappointment. Star testing at the scopes max mag of 75x revealed the scope is slightly out of collimation, yet another good reason to get the tools out. Stripping the scope was something that i hoped wouldn’t cause too many problems, but the complicated design made the task a little harder than i thought. Don’t get me wrong.. the strip down was easy as all the major bolts are the same size and the only tools needed were two allen keys a screwdriver and a blunt knife…..
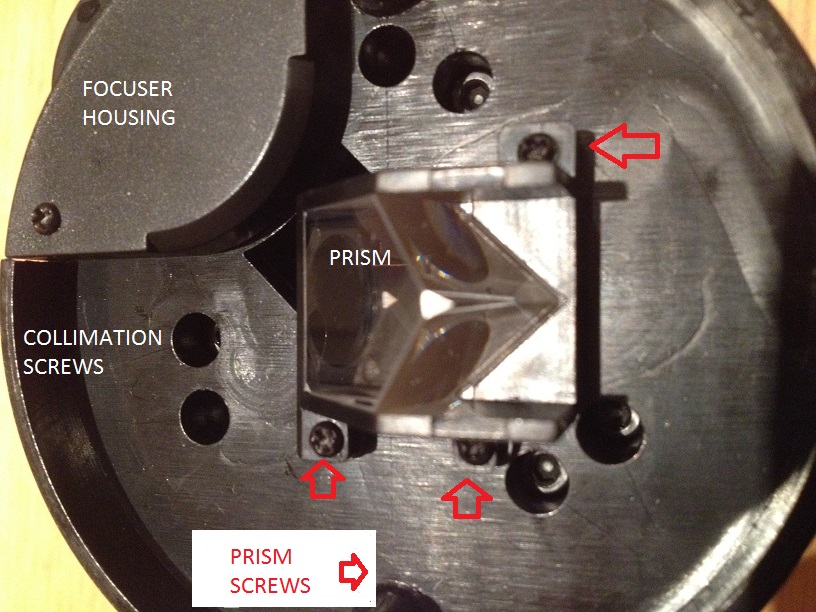
I started by removing the rubber outer covering, a simple task as it’s only epoxyed in two places. There’s a seam running from the front corrector to the tripod mount which came away easily and a small amount at the front side of the focuser wheel. Once the cover was removed, the ota was revealed in it’s full plastic glory! the ota itself is in two parts. The front section is around 4 inches long and only holds the corrector cell, the rear holds the primary mirror, focuser and ep mount. The visual back is only held on by two bolts and once removed reveals where the true costcutting takes place in this scope… sadly. As most amateur astronomers know, the optical train defines how good a telescope will perform. In this scope the optical train fails due to a tiny 45 degree prism that provides the correct image view. Prisms are hard to make well, especially the smaller you go…. this is one of the smallest prisms i’ve seen in any telescope, and i doubt very much that manufacturing costs were based around this item. Star testing revealed an obvious vertical line which would be almost invisible in a quality correct image diagonal. Other points of interest on the backplate are the 6 holes for the collimating screws and the focuser cover. Here’s a pic for reference.

I knew that i would have to collimate the scope but having the eyepiece mount seperate to the diagonal will make things that little bit more laborious. I will have to fit and remove the visual back with every adjustment, which won’t be helped by the closeness of the collimation screws to the centre of the backplate! Because they are close to the centre any slight adjustment will make larger changes than if Celestron had positioned the screws further out. Back to the fix… the focuser was sloppy which turned out to be 2 loose bolts that hold the focuser to the primary backplate. To get to them i had to remove the focuser cover and the screw and grub screw that hold the focuser wheel in place. Remember to have the scope on it’s side when you do this, as the primary mirror will just slide straight out. You can leave the backplate that provides collimation adjustment in place if you don’t fancy touching the collimation screws. Here are some pics of the primary removed and the empty ota.


Once the focuser screws were tightened i put the scope back together. Star testing showed the collimation was the same as before but poor weather has meant i haven’t been able to get out and collimate the C70. I must consider buying an artificial star… Next a quick summary of it’s performance….
Overall the C70 performs about as well as a 50-60mm refractor which came as no surprise as the Skymax 102 was comparable to my 80mm refractor. The eyepiece isn’t bad… i tried it in a refractor and it performed on par with budget plossl’s. The ep has very smooth action and can be used to help with focus….. the focuser is like all maks.. very sensitive. I took a little time cruising through Cygnus on my first clear night, most of the stars were pinpoint but brighter stars weren’t! this shows the need for collimation. Daylight use shows a very reasonable little scope which is light and very portable. I don’t doubt there are better products available but i do know there are worse… Celestron’s own 40 and 50mm refractors are terrible and nowhere near as good as the C70. Other reviews on astro forums give the C70 a slating for it’s mediocre performance which in standard trim are justified. The Achilles heel with this scope is the prism which most buyers won’t have the tools, experience or even inclination to improve…. but for me the next challenge is either fitting a better prism or removing it completely and installing a 1.25″ visual back straight to the ota backplate… but that’s for another time as i’m about to move house… i’ll finish off with a few more pics.